What is Storage
Storage is where your app keeps files - profile pictures, uploaded documents, product images, videos, and any other files your users need. OptiDev Cloud Storage gives you:- Fast global delivery - Files are served through a CDN, so they load quickly worldwide
- Flexible access control - Make files public for everyone or private for specific users
- Organized structure - Group files into “buckets” for different purposes
- Upload restrictions - Set file size limits and allowed file types per bucket
Understanding Buckets
Files are organized into buckets - think of them like folders for different types of content.Public vs Private Buckets
Public buckets:- Anyone with the URL can view the files
- Good for: profile pictures, product images, public assets
- Files have permanent, shareable URLs
- Only authorized users can access files
- Good for: personal documents, invoices, sensitive data
- Files require special “signed URLs” with expiration times
Using Storage with OptiDev Agent
The easiest way to add file storage to your app is to describe what you need.Example: Profile Pictures
“Add profile picture upload to my user settings page and display them next to usernames”OptiDev Agent will:
- Create a storage bucket for avatars
- Add an upload component to your settings page
- Save the image URL to the user’s profile
- Display the picture throughout your app
Example: Document Uploads
“Let users upload PDF documents to their account with a download button for each file”OptiDev Agent will:
- Set up a private storage bucket for documents
- Create an upload interface
- Build a file list with download buttons
- Set up access policies so users only see their own files
Example: Public Gallery
“Create a public image gallery where anyone can see the images but only authenticated users can upload”OptiDev Agent will:
- Create a public storage bucket for the gallery
- Add an image upload component for logged-in users
- Display a gallery view visible to everyone
- Set up policies for public read and authenticated upload
Managing Buckets in the Dashboard
Viewing Your Buckets
- Go to the Storage tab in OptiDev Cloud
- You’ll see a grid of bucket cards
- Each card shows the bucket name and a Public or Private badge
Creating a New Bucket
- Click the New bucket button
- Enter a bucket name (this cannot be changed later)
- Choose visibility:
- Public - Anyone can view files
- Private - Only authorized users can access
- Optionally set restrictions (see Bucket Settings below)
- Click Create bucket
Bucket Settings
Click any bucket to open it, then click the Edit bucket dropdown and select Bucket settings to configure: File Size Limit- Toggle on to restrict maximum file size
- Enter the limit in megabytes (MB)
- Uploads exceeding this size will be rejected
- Default is 50 MB if not set
- Toggle on to restrict which file types can be uploaded
- Enter MIME types separated by commas
- Examples:
image/png, image/jpegorapplication/pdf
Bucket settings help prevent users from uploading inappropriate or oversized files. Set these before adding upload functionality to your app.
Emptying or Deleting a Bucket
- Click the bucket you want to modify
- Click the Edit bucket dropdown
- Select Empty bucket to delete all files but keep the bucket, or Delete bucket to remove everything
- Confirm the action
Browsing Files in the Dashboard
Click any bucket to view its contents:- Breadcrumb navigation - Shows your current location (e.g.,
avatars / users / profile-pics) - File table - Lists all files and folders with Name, Size, and Modified date
- Folder navigation - Click any folder to enter it
- Back button - Return to the bucket list
Uploading Files
- Click a bucket to open it
- Navigate to the folder where you want to upload (or stay at root)
- Click the Upload button
- Select files from your computer
- Files upload directly to storage
Deleting Files
- Find the file you want to delete
- Click the trash icon next to the file
- Confirm the deletion
Viewing Storage Policies
Storage policies (Row Level Security) control who can access files in each bucket.Viewing Policies
- Click a bucket to open it
- Click the Policies button
- A modal shows all security rules for this bucket
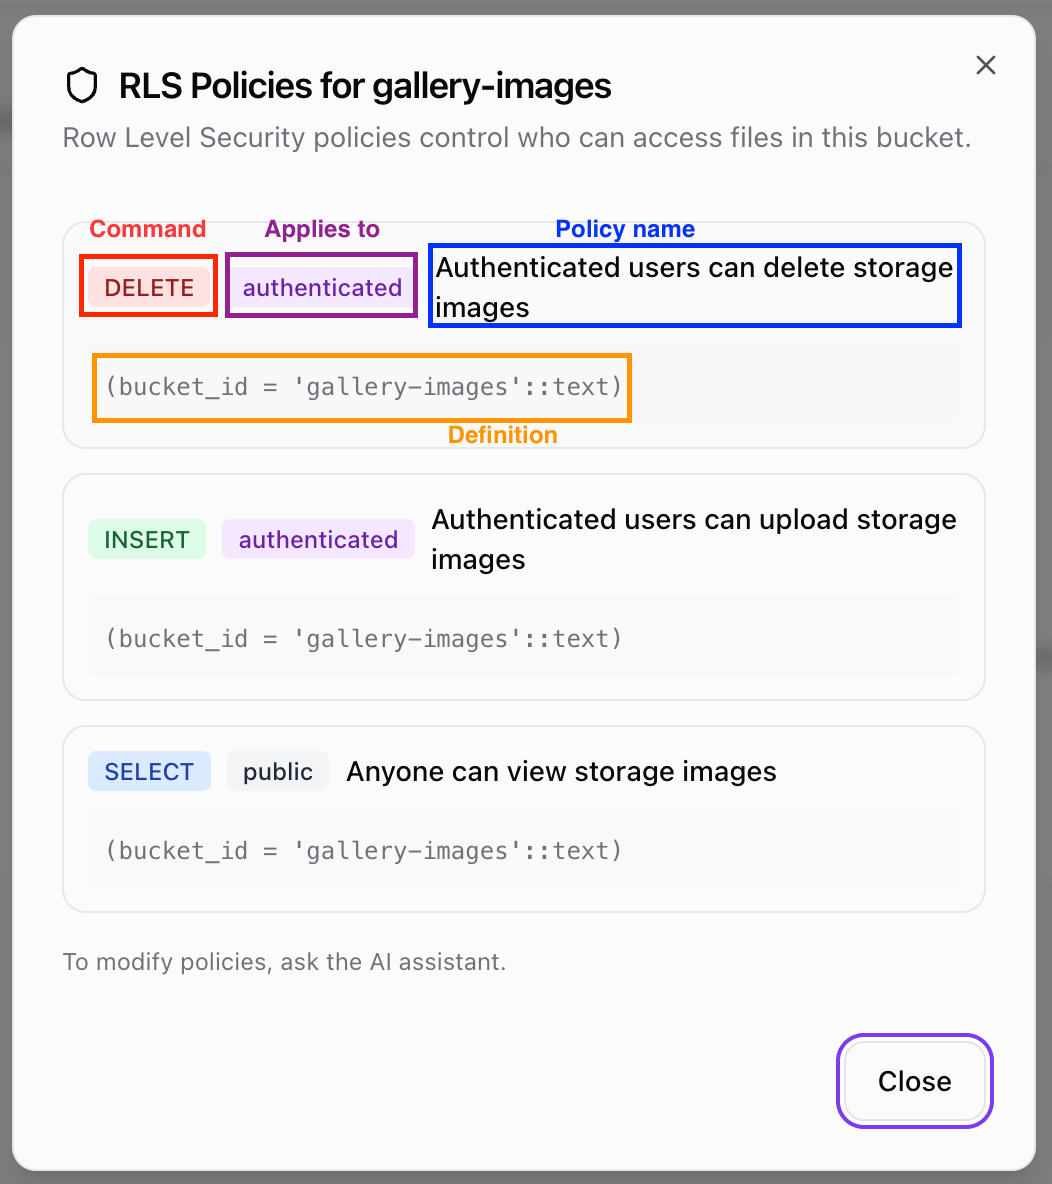
Understanding Policies
Each policy shows:- Policy name - Descriptive name for the rule
- Command - What action it controls (SELECT, INSERT, DELETE, etc.)
- Applies to - Who the rule affects:
public- Anyone, including users who are not logged inauthenticated- Only users who are logged in- Other custom roles as defined in your app
- Definition - The actual security condition
Modifying Policies
Policies cannot be edited directly in the dashboard. To create or change policies, describe the access rules you want to OptiDev Agent:“Only let authenticated users upload files to the documents bucket”
“Users should only be able to see and delete their own files”
“Make the avatars bucket publicly readable but only allow uploads from logged-in users”OptiDev Agent will create the appropriate Row Level Security policies for you.
Storage Limits and Quotas
OptiDev Cloud includes storage with your plan:- Files are stored securely with automatic backups
- Large files are handled efficiently
- No per-file charges for standard usage
For Developers
Technical Reference
Technical Reference
Supabase Storage Client
Upload files using the Supabase JavaScript client:Getting Public URLs
Creating Signed URLs
For private files with expiration:Listing Files
Deleting Files
Bucket Configuration
When creating buckets programmatically, you can set:Row Level Security Policies
Control access with RLS policies on thestorage.objects table. Common patterns:Public read access:{user_id}/filename.ext.Ask OptiDev Agent to set up RLS policies:“Only let users access their own files in the documents bucket”