

What is Auth
Auth (authentication) lets users create accounts and log into your app. OptiDev Cloud handles all the complex parts:- Account creation - Users can sign up with email, phone, or Google
- Secure login - Password hashing, session management, all handled for you
- Password reset - Automatic “forgot password” emails
- User management - See all your users and their account details
Adding Login with OptiDev Agent
Example: Basic Email Login
“Add user login to my app with email and password”OptiDev Agent will:
- Enable email authentication
- Create sign-up and login forms
- Add logout functionality
- Show different content for logged-in vs logged-out users
Example: Google Sign-In
“Let users sign in with their Google account”OptiDev Agent will set up Google OAuth, add a “Sign in with Google” button, and handle the flow.
Example: Phone Login
“Add phone number login with SMS verification codes”OptiDev Agent will enable phone authentication, create a phone-number form, and handle SMS code verification.
Sign-In Methods
OptiDev Cloud supports three sign-in methods. Each one has its own row at the top of the Authentication tab — click a row to expand its settings.Email Settings
Click Email to expand the settings panel. The main controls:- Enable email sign-in — Master toggle for this method.
- Confirm email — When on, users must click a link in their email before they can use your app. Recommended.
- Secure email change — Requires re-authentication before a user can change their email.
- Secure password change — Requires re-authentication before a user can change their password.
- Prevent leaked passwords — Checks passwords against the HaveIBeenPwned database and blocks ones that have appeared in known breaches.
- Minimum password length — Between 6 and 72 characters (default 6).
- Password requirements — None, letters + digits, mixed case + digits, or mixed case + digits + symbols.
- OTP expiration and OTP length — Controls one-time codes used for magic links and password resets.
Phone Settings
Click Phone to expand. OptiDev Cloud sends SMS verification codes through a provider of your choice.SMS Provider
Pick one from the dropdown:- Twilio — needs Account SID, Auth Token, Message Service SID
- Twilio Verify — needs Account SID, Auth Token, Verify Service SID (optional Content SID for WhatsApp)
- MessageBird — needs Access Key and Originator
- Textlocal — needs API Key and Sender
- Vonage — needs API Key, API Secret, and From number
“Set up phone authentication using Twilio”
Other phone controls
- Phone confirmations — Require users to verify their phone before signing in.
- SMS OTP expiry and OTP length — Tune how long codes are valid and how many digits they have.
- SMS template — Customize the message body; use
{{ .Code }}as the placeholder for the verification code. - Test phone numbers — Pre-set
phone=otppairs for testing without sending real SMS.
Google Settings
Click Google to expand. To enable Google sign-in you need OAuth credentials from Google Cloud Console.- Client ID(s) — Comma-separated. You can list multiple IDs here for Web OAuth, Android, One Tap, and Chrome extensions all at once.
- Client Secret — From your Google Cloud OAuth client.
- Skip nonce checks — Leave off unless you have a specific reason; nonce checks protect against replay attacks.
- Callback URL — Read-only field shown in the panel. Copy this and paste it into your Google OAuth client’s “Authorized redirect URIs” list.
General Settings
Below the sign-in methods, three toggles control who can join your app:- Allow new signups — When off, only existing users can log in. Good for invite-only apps.
- Anonymous sign-in — Lets people use your app without creating an account. They can convert to a full account later by adding an email or phone.
- Require email confirmation — A general version of the per-provider email confirmation toggle above.
Advanced Settings
Click Advanced at the bottom of the configuration section to expose:Site URL
The main URL of your app. Used in email templates for links back to your app (e.g. password-reset links).Redirect URLs
A list of URLs users may be redirected to after logging in. Each entry is automatically suffixed with/** so any path under that domain is allowed. URLs must use https://. Only add domains you control.
Custom SMTP
By default, OptiDev Cloud sends auth emails (invitations, magic links, password resets) through a built-in service capped at 2 emails per hour. To send more — and from your own branded address — connect your own email provider with Custom SMTP.You need a domain you own. Auth emails must be sent from an address on a domain you control (e.g.
noreply@yourcompany.com). You can’t send from your app’s default .optiedge.cc URL, because you don’t control its DNS. If you don’t have a domain, the built-in sender (2/hour) is your only option.Setting it up (example: Resend)
- Verify your domain with your email provider. In Resend, add your domain — it will show you a few DNS records to copy into your domain’s DNS settings (wherever your domain is registered). Once added, Resend marks the domain Verified, usually within a few minutes.
- Create an API key in the provider.
- In the Authentication tab, scroll to Custom SMTP, turn on Enable custom SMTP, and fill in:
- Click Save changes, then send a test invite. Emails now come from your domain.
Managing Users
The right side of the Authentication tab shows everyone who has signed up.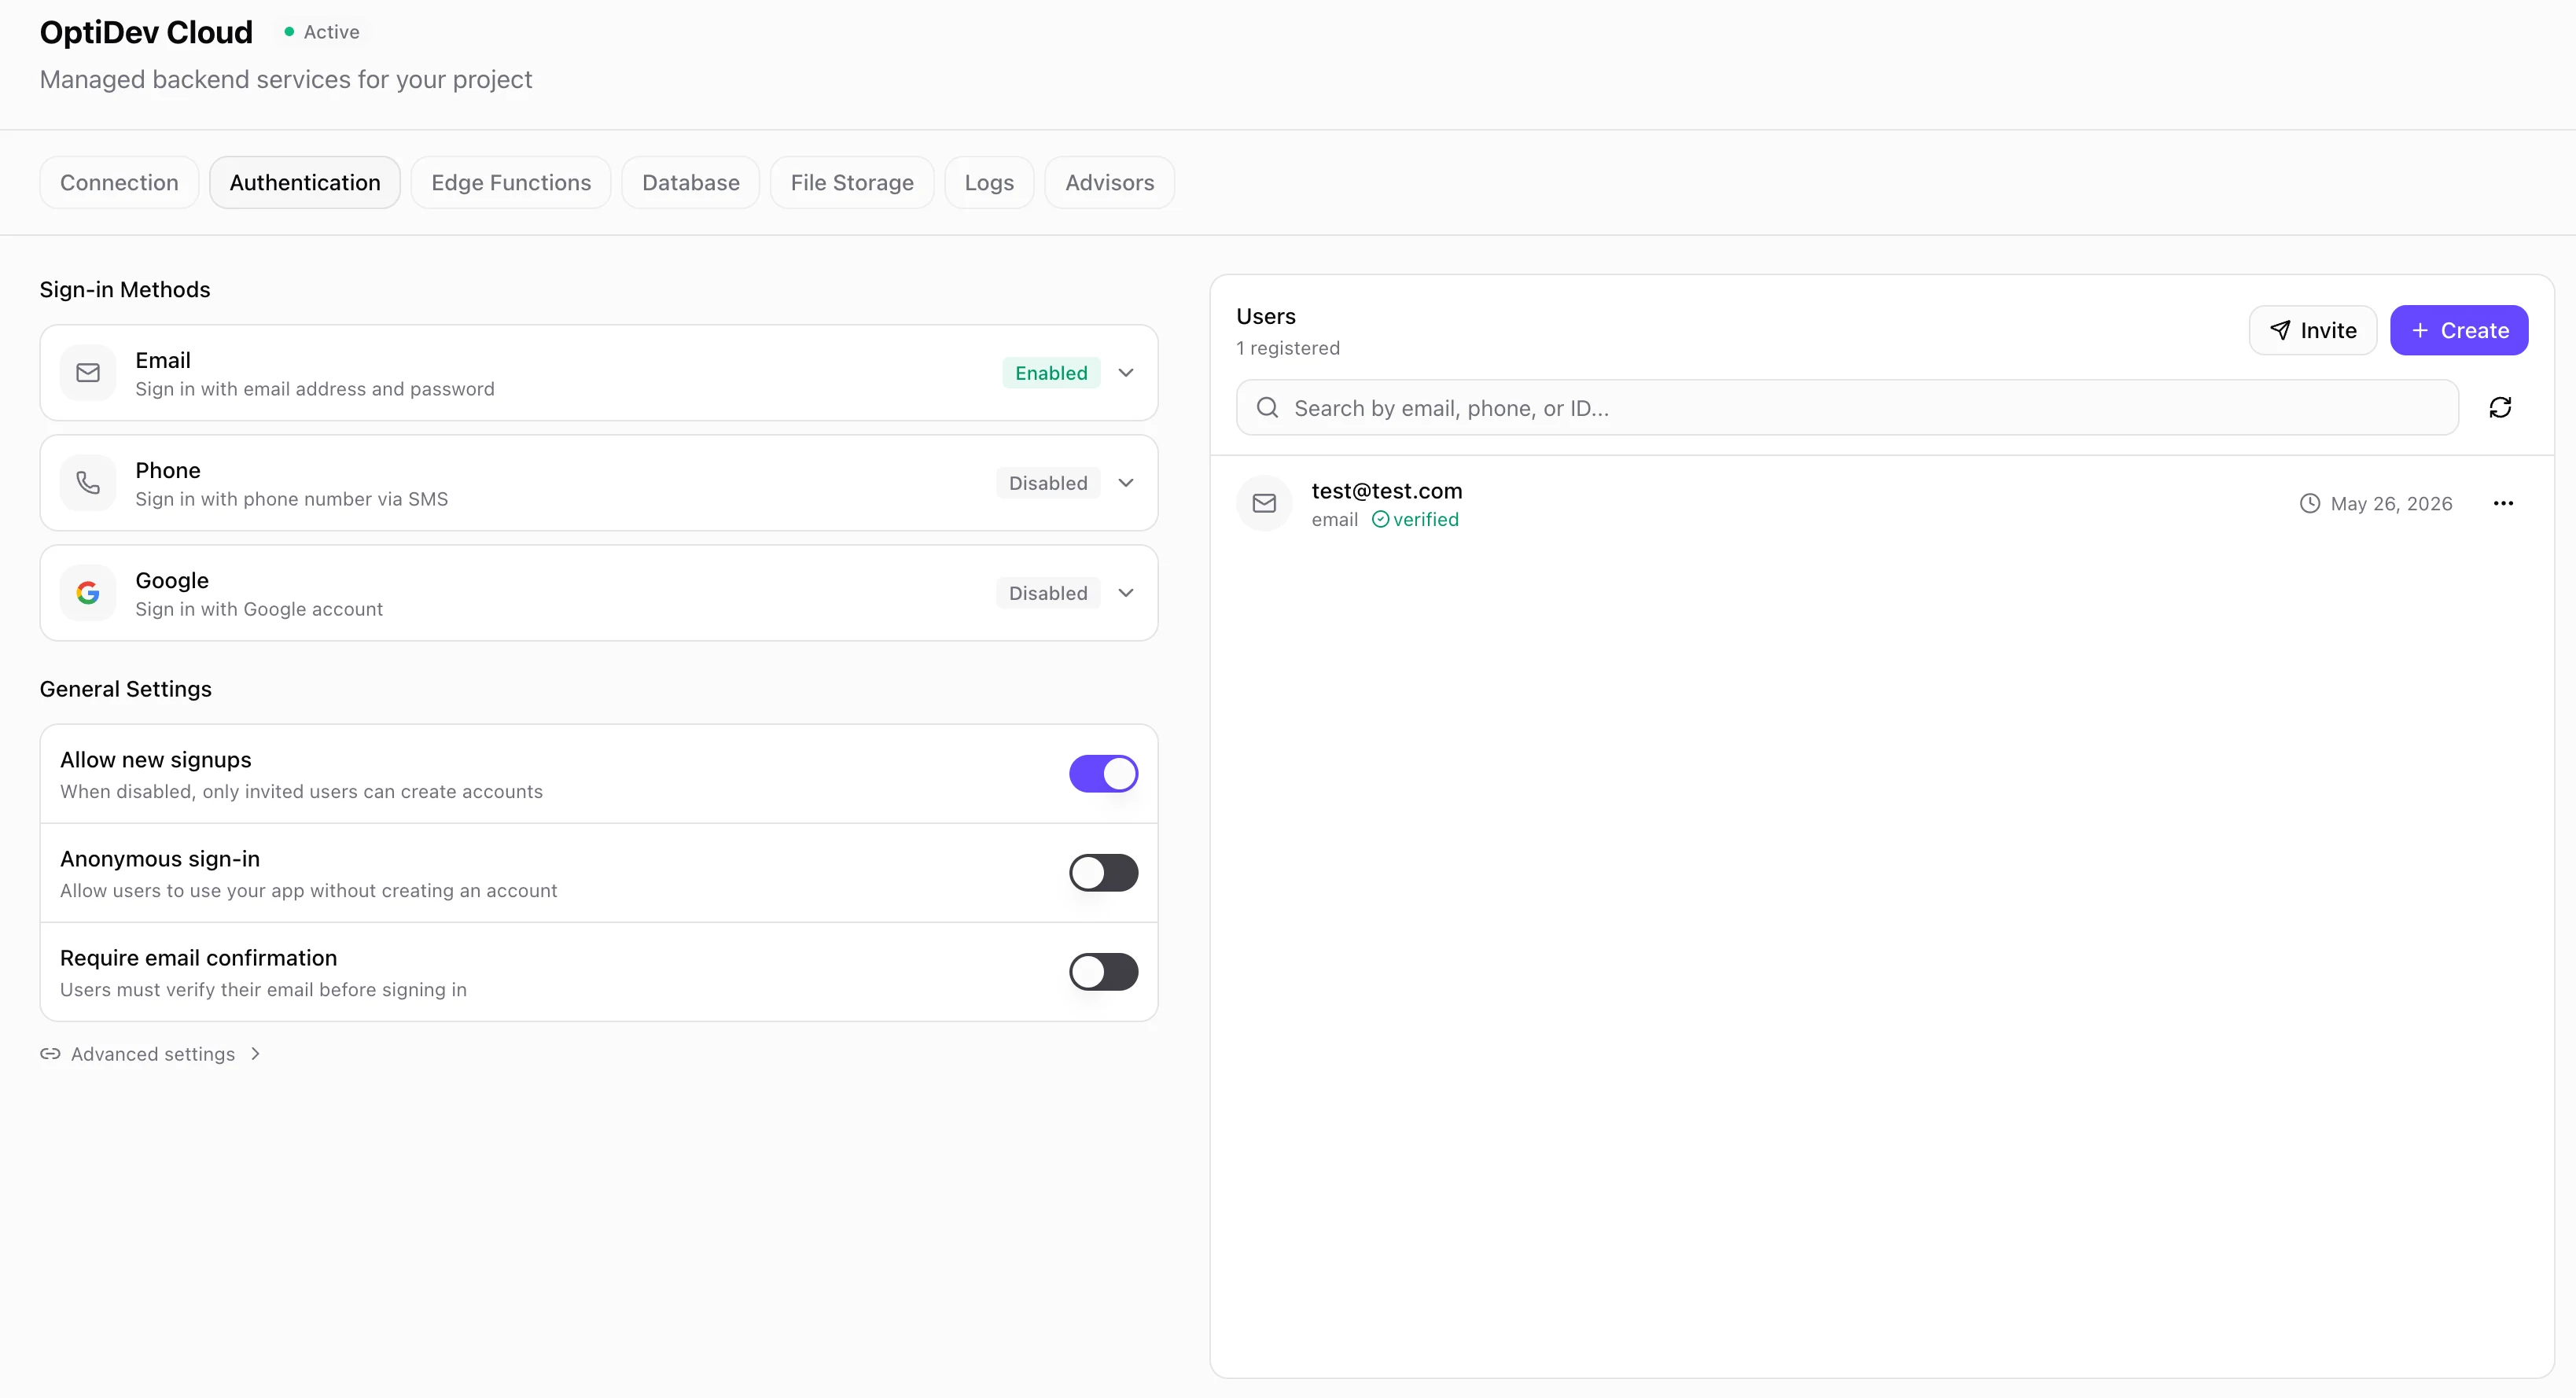
- Create a user manually (email + password, optional phone).
- Invite a user by email so they pick their own password.
- Click the
…menu on any user row to send them a Magic link (passwordless sign-in email) or Delete their account. - Click a row to see full details (UUID, last sign-in, verification timestamps, enabled login methods).
- Search by email, phone, or user ID. List shows 10 per page.
Security Best Practices
- Require email confirmation to verify real addresses and reduce fake accounts.
- Keep sign-in options simple. Pick one or two methods that fit your audience instead of enabling everything.
- Use Row Level Security to make sure users can only access their own data:
“Make sure users can only see their own orders”OptiDev Agent will set up the right policies for you.
For Developers
Technical Reference
Technical Reference
Supabase Auth Client
Row Level Security
User management API
User object shape
Admin SDK
OptiDev Cloud calls the Supabase JS admin client under the hood:Rate limits
- User listing / creation / deletion: ~60-100 requests per minute
- Email sending: 2 per hour on the built-in service (invites, magic links, password resets). Custom SMTP lifts this — set your own Emails per hour.