> ## Documentation Index
> Fetch the complete documentation index at: https://docs.optidev.ai/llms.txt
> Use this file to discover all available pages before exploring further.
# Authentication
> Configure sign-in methods and manage users for your app
## What is Auth
Auth (authentication) lets users create accounts and log into your app. OptiDev Cloud handles all the complex parts:
* **Account creation** - Users can sign up with email, phone, or Google
* **Secure login** - Password hashing, session management, all handled for you
* **Password reset** - Automatic "forgot password" emails
* **User management** - See all your users and their account details
You don't need to build any of this from scratch - just tell OptiDev Agent what you need.
***
## Adding Login with OptiDev Agent
### Example: Basic Email Login
> *"Add user login to my app with email and password"*
OptiDev Agent will:
1. Enable email authentication
2. Create sign-up and login forms
3. Add logout functionality
4. Show different content for logged-in vs logged-out users
### Example: Google Sign-In
> *"Let users sign in with their Google account"*
OptiDev Agent will set up Google OAuth, add a "Sign in with Google" button, and handle the flow.
### Example: Phone Login
> *"Add phone number login with SMS verification codes"*
OptiDev Agent will enable phone authentication, create a phone-number form, and handle SMS code verification.
***
## Sign-In Methods
OptiDev Cloud supports three sign-in methods. Each one has its own row at the top of the Authentication tab — click a row to expand its settings.
| Method | Best for |
| -------------------- | --------------------------------------------------------------- |
| **Email & password** | Most apps; enabled by default |
| **Phone (SMS)** | Mobile-first apps; users who prefer not to manage passwords |
| **Google** | Quick onboarding; users who'd rather not create another account |
***
## Email Settings
Click **Email** to expand the settings panel. The main controls:
* **Enable email sign-in** — Master toggle for this method.
* **Confirm email** — When on, users must click a link in their email before they can use your app. Recommended.
* **Secure email change** — Requires re-authentication before a user can change their email.
* **Secure password change** — Requires re-authentication before a user can change their password.
* **Prevent leaked passwords** — Checks passwords against the HaveIBeenPwned database and blocks ones that have appeared in known breaches.
* **Minimum password length** — Between 6 and 72 characters (default 6).
* **Password requirements** — None, letters + digits, mixed case + digits, or mixed case + digits + symbols.
* **OTP expiration** and **OTP length** — Controls one-time codes used for magic links and password resets.
***
## Phone Settings
Click **Phone** to expand. OptiDev Cloud sends SMS verification codes through a provider of your choice.
### SMS Provider
Pick one from the dropdown:
* **Twilio** — needs Account SID, Auth Token, Message Service SID
* **Twilio Verify** — needs Account SID, Auth Token, Verify Service SID (optional Content SID for WhatsApp)
* **MessageBird** — needs Access Key and Originator
* **Textlocal** — needs API Key and Sender
* **Vonage** — needs API Key, API Secret, and From number
You'll need an account with one of these providers before phone login will work. OptiDev Agent can help wire up the credentials:
> *"Set up phone authentication using Twilio"*
### Other phone controls
* **Phone confirmations** — Require users to verify their phone before signing in.
* **SMS OTP expiry** and **OTP length** — Tune how long codes are valid and how many digits they have.
* **SMS template** — Customize the message body; use `{{ .Code }}` as the placeholder for the verification code.
* **Test phone numbers** — Pre-set `phone=otp` pairs for testing without sending real SMS.
***
## Google Settings
Click **Google** to expand. To enable Google sign-in you need OAuth credentials from Google Cloud Console.
* **Client ID(s)** — Comma-separated. You can list multiple IDs here for Web OAuth, Android, One Tap, and Chrome extensions all at once.
* **Client Secret** — From your Google Cloud OAuth client.
* **Skip nonce checks** — Leave off unless you have a specific reason; nonce checks protect against replay attacks.
* **Callback URL** — Read-only field shown in the panel. Copy this and paste it into your Google OAuth client's "Authorized redirect URIs" list.
***
## General Settings
Below the sign-in methods, three toggles control who can join your app:
* **Allow new signups** — When off, only existing users can log in. Good for invite-only apps.
* **Anonymous sign-in** — Lets people use your app without creating an account. They can convert to a full account later by adding an email or phone.
* **Require email confirmation** — A general version of the per-provider email confirmation toggle above.
***
## Advanced Settings
Click **Advanced** at the bottom of the configuration section to expose:
### Site URL
The main URL of your app. Used in email templates for links back to your app (e.g. password-reset links).
### Redirect URLs
A list of URLs users may be redirected to after logging in. Each entry is automatically suffixed with `/**` so any path under that domain is allowed. URLs must use `https://`. Only add domains you control.
***
## Custom SMTP
By default, OptiDev Cloud sends auth emails (invitations, magic links, password resets) through a built-in service capped at **2 emails per hour**. To send more — and from your own branded address — connect your own email provider with **Custom SMTP**.
**You need a domain you own.** Auth emails must be sent from an address on a domain you control (e.g. `noreply@yourcompany.com`). You can't send from your app's default `.optiedge.cc` URL, because you don't control its DNS. If you don't have a domain, the built-in sender (2/hour) is your only option.
### Setting it up (example: Resend)
1. **Verify your domain** with your email provider. In [Resend](https://resend.com), add your domain — it will show you a few **DNS records** to copy into your domain's DNS settings (wherever your domain is registered). Once added, Resend marks the domain **Verified**, usually within a few minutes.
2. **Create an API key** in the provider.
3. In the **Authentication** tab, scroll to **Custom SMTP**, turn on **Enable custom SMTP**, and fill in:
| Field | Value (Resend) |
| ------------------------- | ----------------------------------------------------------------- |
| Host | `smtp.resend.com` |
| Port | `465` |
| Username | `resend` |
| Password | your API key |
| Sender email (From) | `noreply@yourdomain.com` — must be on your **verified** domain |
| Sender name | Your app or company name |
| Emails per hour | Raise above the built-in 2 (e.g. 100) |
| Minimum interval per user | Seconds before another email can go to the same user (default 60) |
4. Click **Save changes**, then send a test invite. Emails now come from your domain.
The **Sender email must match the domain you verified** with your provider. A mismatch — for example sending from `noreply@send.yourdomain.com` when only `yourdomain.com` is verified — is rejected with a "domain is not verified" error.
Other providers (SendGrid, Amazon SES, Mailgun, Postmark) work the same way — only the **Host** and **Username** differ. To turn it off, toggle **Enable custom SMTP** off; auth emails revert to the built-in sender.
***
## Managing Users
The right side of the Authentication tab shows everyone who has signed up.
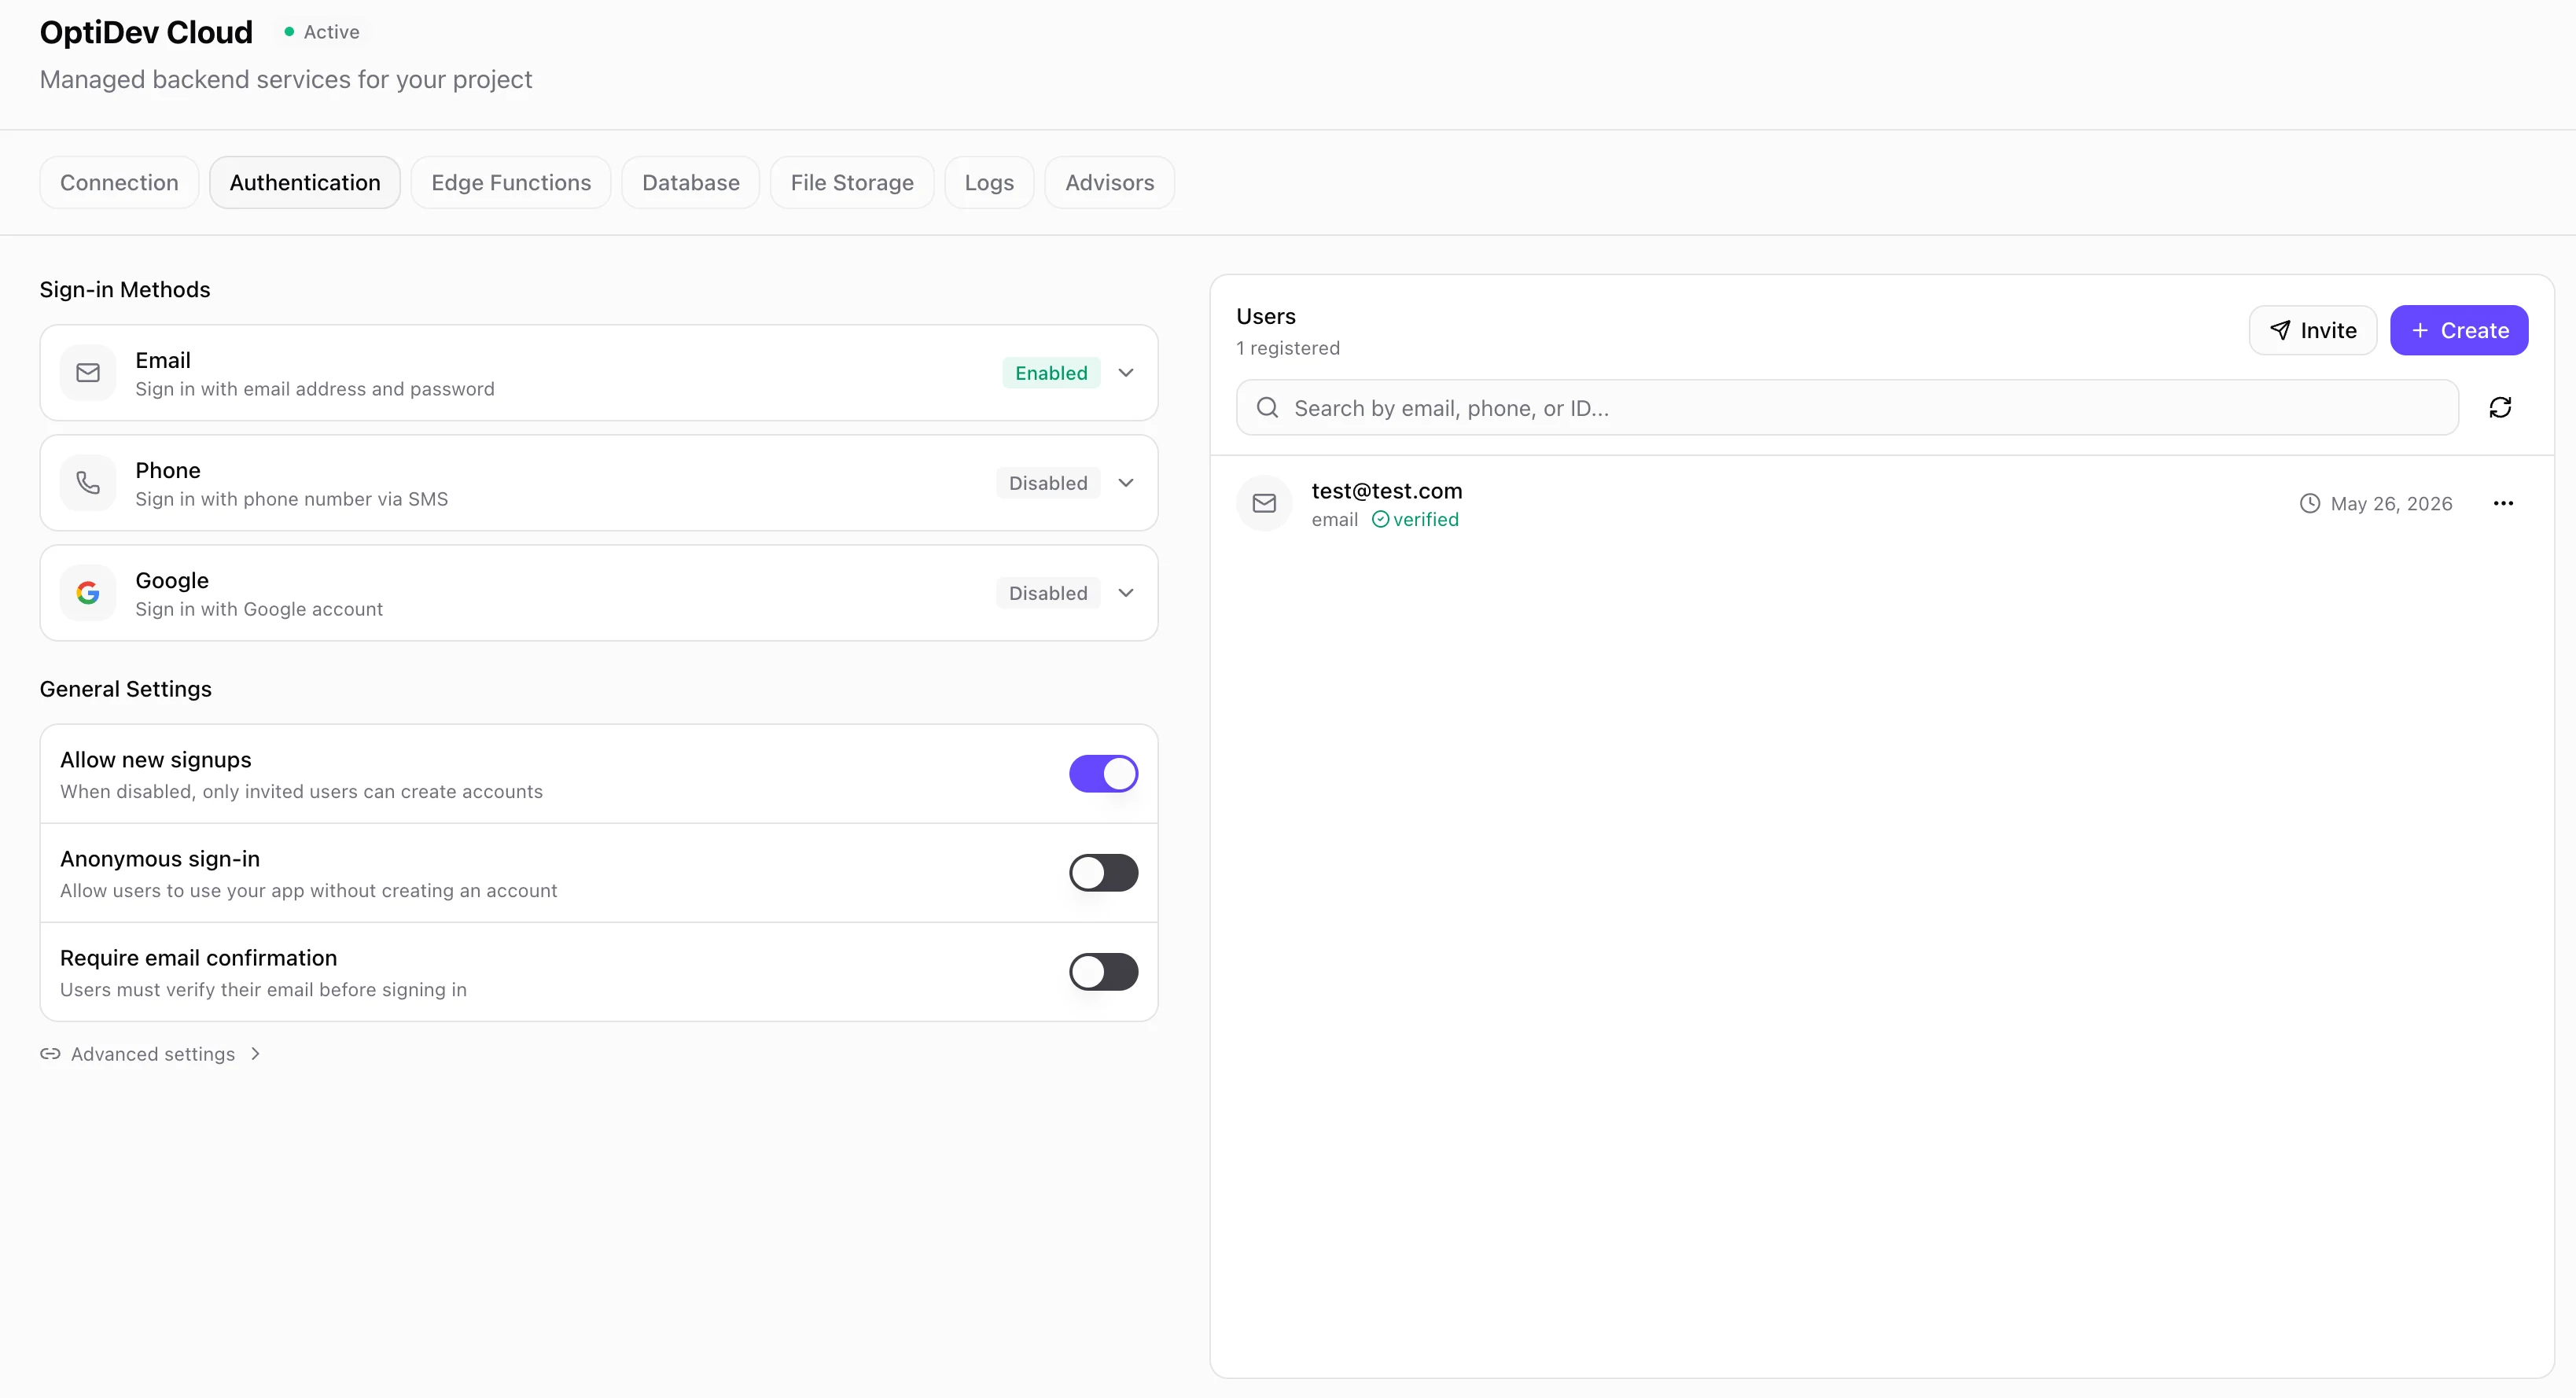 * **Create** a user manually (email + password, optional phone).
* **Invite** a user by email so they pick their own password.
* Click the `…` menu on any user row to send them a **Magic link** (passwordless sign-in email) or **Delete** their account.
* Click a row to see full details (UUID, last sign-in, verification timestamps, enabled login methods).
* Search by email, phone, or user ID. List shows 10 per page.
**Email rate limit:** the built-in email service is capped at **2 emails per hour** (invitations, magic links, password resets). To send more — and from your own branded address — set up [Custom SMTP](#custom-smtp).
***
## Security Best Practices
* **Require email confirmation** to verify real addresses and reduce fake accounts.
* **Keep sign-in options simple.** Pick one or two methods that fit your audience instead of enabling everything.
* **Use Row Level Security** to make sure users can only access their own data:
> *"Make sure users can only see their own orders"*
OptiDev Agent will set up the right policies for you.
***
## For Developers
### Supabase Auth Client
```typescript theme={null}
// Check who's logged in
const { data: { user } } = await supabase.auth.getUser()
// Sign up
await supabase.auth.signUp({ email, password })
// Sign in
await supabase.auth.signInWithPassword({ email, password })
// Sign in with Google
await supabase.auth.signInWithOAuth({ provider: 'google' })
// Sign out
await supabase.auth.signOut()
// React to auth changes
supabase.auth.onAuthStateChange((event, session) => {
// event: 'SIGNED_IN' | 'SIGNED_OUT' | 'TOKEN_REFRESHED' | ...
})
```
### Row Level Security
```sql theme={null}
-- Users can only see their own orders
CREATE POLICY "Users see own orders" ON orders
FOR SELECT USING (auth.uid() = user_id);
```
### User management API
```http theme={null}
GET /api/supabase/projects/:projectId/auth/users?page=1&perPage=10
POST /api/supabase/projects/:projectId/auth/users
POST /api/supabase/projects/:projectId/auth/users/invite
DELETE /api/supabase/projects/:projectId/auth/users/:userId
```
All endpoints require a Firebase Bearer token.
### User object shape
```typescript theme={null}
interface User {
id: string; // UUID
email?: string;
phone?: string;
created_at: string; // ISO 8601
updated_at: string;
last_sign_in_at?: string;
email_confirmed_at?: string;
phone_confirmed_at?: string;
invited_at?: string;
app_metadata: { provider: string }; // 'email' | 'phone' | 'google'
user_metadata: Record; // Custom fields
}
```
### Admin SDK
OptiDev Cloud calls the Supabase JS admin client under the hood:
```typescript theme={null}
await supabase.auth.admin.listUsers({ page: 1, perPage: 10 })
await supabase.auth.admin.createUser({ email, password, email_confirm: true })
await supabase.auth.admin.deleteUser(userId)
await supabase.auth.admin.inviteUserByEmail(email, { redirectTo })
```
### Rate limits
* User listing / creation / deletion: \~60-100 requests per minute
* **Email sending: 2 per hour** on the built-in service (invites, magic links, password resets). [Custom SMTP](#custom-smtp) lifts this — set your own **Emails per hour**.
* **Create** a user manually (email + password, optional phone).
* **Invite** a user by email so they pick their own password.
* Click the `…` menu on any user row to send them a **Magic link** (passwordless sign-in email) or **Delete** their account.
* Click a row to see full details (UUID, last sign-in, verification timestamps, enabled login methods).
* Search by email, phone, or user ID. List shows 10 per page.
**Email rate limit:** the built-in email service is capped at **2 emails per hour** (invitations, magic links, password resets). To send more — and from your own branded address — set up [Custom SMTP](#custom-smtp).
***
## Security Best Practices
* **Require email confirmation** to verify real addresses and reduce fake accounts.
* **Keep sign-in options simple.** Pick one or two methods that fit your audience instead of enabling everything.
* **Use Row Level Security** to make sure users can only access their own data:
> *"Make sure users can only see their own orders"*
OptiDev Agent will set up the right policies for you.
***
## For Developers
### Supabase Auth Client
```typescript theme={null}
// Check who's logged in
const { data: { user } } = await supabase.auth.getUser()
// Sign up
await supabase.auth.signUp({ email, password })
// Sign in
await supabase.auth.signInWithPassword({ email, password })
// Sign in with Google
await supabase.auth.signInWithOAuth({ provider: 'google' })
// Sign out
await supabase.auth.signOut()
// React to auth changes
supabase.auth.onAuthStateChange((event, session) => {
// event: 'SIGNED_IN' | 'SIGNED_OUT' | 'TOKEN_REFRESHED' | ...
})
```
### Row Level Security
```sql theme={null}
-- Users can only see their own orders
CREATE POLICY "Users see own orders" ON orders
FOR SELECT USING (auth.uid() = user_id);
```
### User management API
```http theme={null}
GET /api/supabase/projects/:projectId/auth/users?page=1&perPage=10
POST /api/supabase/projects/:projectId/auth/users
POST /api/supabase/projects/:projectId/auth/users/invite
DELETE /api/supabase/projects/:projectId/auth/users/:userId
```
All endpoints require a Firebase Bearer token.
### User object shape
```typescript theme={null}
interface User {
id: string; // UUID
email?: string;
phone?: string;
created_at: string; // ISO 8601
updated_at: string;
last_sign_in_at?: string;
email_confirmed_at?: string;
phone_confirmed_at?: string;
invited_at?: string;
app_metadata: { provider: string }; // 'email' | 'phone' | 'google'
user_metadata: Record; // Custom fields
}
```
### Admin SDK
OptiDev Cloud calls the Supabase JS admin client under the hood:
```typescript theme={null}
await supabase.auth.admin.listUsers({ page: 1, perPage: 10 })
await supabase.auth.admin.createUser({ email, password, email_confirm: true })
await supabase.auth.admin.deleteUser(userId)
await supabase.auth.admin.inviteUserByEmail(email, { redirectTo })
```
### Rate limits
* User listing / creation / deletion: \~60-100 requests per minute
* **Email sending: 2 per hour** on the built-in service (invites, magic links, password resets). [Custom SMTP](#custom-smtp) lifts this — set your own **Emails per hour**.